Friday, January 24, 2014

Lydia Martin Tutorial!!! (Q)


     Holland Roden plays Lydia Martin on the hit MTV show, Teen Wolf. Lydia is the popular girl at school that manages to not only maintain good grades, but fresh and up-to-date hair and makeup as well. In every episode, her character manages to change it up, whether her hair is straight or up in a top-knot bun, or if her makeup is natural or dramatic. Either situation, she pulls it off every time!

     In this tutorial, we will be explaining how to do a natural makeup look with a rosy finish. Then, you will learn how to do a braided headband with soft, loose curls to finish.

Makeup Directions:
     1. Begin with a clean and moisturized face and lips, as usual. Lydia's face appears to be flawless and to achieve that look, you don't need old makeup clogging your pores and making you break out.
     2. After washing your hands, grab a makeup sponge and Maybelline's Dream Fresh BB Cream. BB Creams will not only give you the appropriate coverage that you need, but it will supply your skin with nutrients throughout the day that will block the sun and prevent wrinkles from forming. With the sponge, dot the makeup on your forehead, cheeks, nose, chin, and neck. Then, begin blending out the product outwards towards your hairline. For a flawless finish, dab the sponge over your skin repeatedly.
     3. For extra coverage, begin applying the Maybelline Fit Me Concealer under your eyes, the sides of your nose, and any other imperfections you may have. Be sure to focus mainly beneath your eyes because Lydia appears to be fully awake and she uses a bright concealer to get that.
     4. With a fluffy Kabuki brush, begin applying Bare Minerals Mineral Veil all over your face lightly. This will prevent your complexion from being too shiny, but will maintain the natural glow you need.
     5. With Benefit's High Beam highlighter, dot the product on your cheekbones and begin blending upwards towards your temple.
     6. For blush, take Bobbi Brown's Shimmer Brick in the color Nectar and a fluffy blush brush. Smile and apply the product to the apples of your cheeks in a circular motion.
     7. Groom your eyebrows with a spooly brush and prep them for brow powder. Lydia's eyebrows aren't bold, but are clearly filled in. So, with Anastasia's Brow Powder Duo and an angled brow brush, begin softly repeating strokes to fill in any bare spots.
     8. Prime your eyelids with Urban Decay's Primer Potion.
     9. Going into Urban Decay's Naked Palette and using the color "Sin" and a flat shader brush, pack the color onto your lid, avoiding the crease. This shimmery champagne color will provide you with the perfect highlight without overdoing it.
     10. Taking a matte light brown color such as "Naked" from the Urban Decay Naked Palette and a fluffy crease brush, apply the color into your crease using windshield wiper motions. Then, in a circular motion, blend the color up and out for a softer look.
     11. Lydia isn't wearing eyeliner in this look, but she is definitely wearing false eyelashes. So, with Lash Grip glue, apply a thin strip along Ardell 120 lashes. These lashes are long and thick, but look real and blend in well with your natural lashes.
     12. Curl your lashes.
     13. Apply one-to-two coats of Maybelline's Rocket Mascara in blackest black to blend your lashes together.
     14. Taking a coral-pink matte lipstick such as NARS Niagara, apply the color over your lips as neatly as you can.
     15. Finish off with Buxom's Full-On Lip Polish lip gloss in the color Bunny.

     Hair Directions:  
              1. Begin this look as you should for any hairstyle, and that is simply by brushing out your hair to get rid of all the knots and tangles out.
    2. Lydia is wearing her hair in big soft curls so to achieve this simple yet messy look, start out with plugging in your curling iron. I recommend using one that has a rather larger barrel to help you get the big curls Lydia has. 
              3. While that is heating up, make sure you spray your hair in a heat protectant. Continuously adding heat to your hair over time, will damage your hair very severely, so make sure you keep it protected. Brush through your hair one more time to evenly distribute the product, making sure you cover root to tip.
         4. Taking your curling iron and about a 2 1/2 inch section of hair, wrap the hair around the barrel of the curling iron, ignoring the clip. Hold for a couple seconds, depending on how long your hair is, and how well it holds a curl. Continue this around your whole head. Don't forget to alternate curling one curl away from your face, and the next towards your face. This will prevent the curls from all clumping together and looking like one giant curl.
           5. Now to start with the detail of the hairstyle; the braided headband. This hairstyle will only work if you have long hair, at least a little past your shoulders. Take a section of hair from your roots, behind your ear. Depending on how big you want your braided headband to be. The bigger the section, the thicker the braid will be. Braid the section of hair all the way down to the end, and secure off the ends with a small elastic.
         6. If you want the headband to be big and full, take the braid and start pulling the strands out to make it a little messy a fuller. Do this all the way down the braid to make it all the same size. If you want the headband to be small and very tight, don't pull at the braid at all. Take the braid that starts behind your ear and bring it up and over the top of your head.
         7. Taking a couple bobby pins, secure the end of the braid behind your other ear so you can't see the loose ends of the braid sticking out.
         8. Brush out the curls with your fingers or gently with a brush to make them more relaxed curls. Also, if you have any bangs, pull a few strands out from under the headband to frame your face. This will also add the the messy effect that Lydia has in the picture, that you are trying to achieve.
        9. A little hairspray will hold not only the braid, but the curls as well.

6

Friday, January 10, 2014

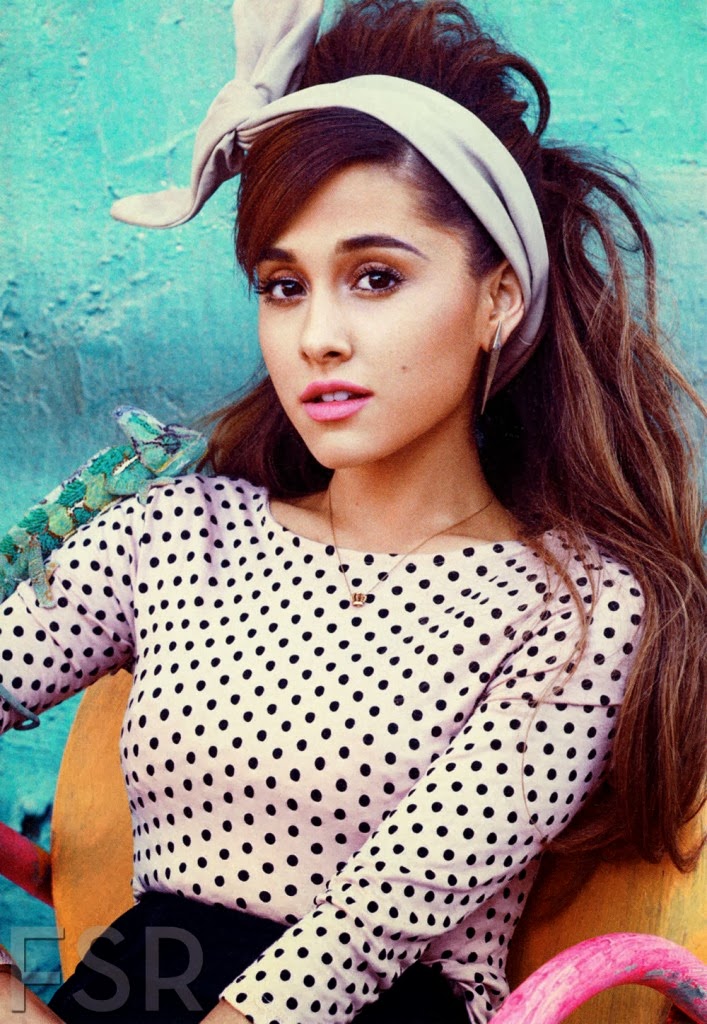
Ariana Grande Teen Vogue Makeup Tutorial!! (O)

     You've probably been seeing a lot of this face lately. If you haven't been seeing her, you've probably been hearing the incredible, unique voice.The artist of the number one album, Yours Truly, who just recently won the People's Choice Award for Breakout Artist of the Year was on the cover of Teen Vogue this month. Ariana Grande is seen in the spread with a retro themed hair, makeup, and outfit look that will get you ready for Valentine's Day with her natural waves and pink lips!

Makeup Directions:
     1. Ariana's face is nearly flawless in the entire magazine. This isn't necessarily a direction, but a tip: drink a lot of water daily. Clear skin is easy to achieve when it's hydrated, and by drinking half of your body weight in ounces, it can stay clean and hydrated.
     2. Clean your skin. Starting with a clean canvas is essential when doing any makeup look at all.
     3. Moisturize. Although all of the water you have been drinking will hydrate your skin, it can't do it all on its own. Apply some type of lip balm to your lips as well. This will prep for the lip stain you will be applying later on. (EOS in Sweet Mint is the best.)
     4. Prime your skin using Smashbox Photo Finish Foundation Primer. You'll only need a small amount so with the product on the tips of your fingers, dot it on your forehead, cheeks, chin, nose, and the rest on your neck. Blend it out.
     5. For foundation, use Neutrogena Healthy Skin Liquid Makeup. This foundation gives a great amount of coverage without looking too cakey. With a dampened makeup sponge, apply the product to your cheeks, forehead, chin, nose, and neck, then begin to blend the product outwards. Switch up your bending techniques by dabbing the product into your skin for a more airbrushed finish.
     6. For the next step, use Hard Candy's Glamoflauge Concealer. This concealer is heavy duty and will cover up the toughest of blemishes. Pat the product beneath your eyes, down the center of your nose, on the sides of your nose, and on any imperfections you may have. Blend out using your ring finger.
     7. Ariana's eyebrows are extremely bold and angular, so begin by grooming them properly with tweezers. Pluck beneath the brow (not above) and in the center. This will clean up any sparse, unwanted hairs you may have.
     8. Brush out your eyebrows using a spooly brush.
     9. With the Anastasia Brow Duo, choose the color that is closest to your hair color on an angled brow brush. (If you're feeling extra daring, go for a shade darker.) Start creating small strokes to fill in the bare spots on your eyebrows, focusing the color more towards the outside of your brow.
     10. Set the eyebrow powder with a clear brow gel.
     11. Prime your eyelids using Urban Decay Primer Potion.
     12. Ariana's eyeshadow appears to be matte so with Urban Decay's Naked Palette in the shade Buck, take a flat shader brush and apply it all over the lids and into the crease. Then, take the color down beneath your lashline.
     13. With a fluffy blending brush, blend the color out using circular motions.
     14. Next, flip your brush over and pack the matte light brown shadow known as Naked onto it. Then, lightly bring that into the space between your crease and brow bone. This will make the red-tones of Buck softer and make the look appear more natural.
     15. With a small brush, apply a light champagne color (such as Virgin) onto your brow bone and in the inner corner of your eye, blending the product out to avoid any harsh lines.
     16. Ariana is not wearing any liner in this look, so you should jump straight to mascara. Taking the Covergirl Flamed Out mascara in Very Black Blaze, apply two to three coats to your top lashes. Focus the brush mainly towards the outer corners of your eyes to create the whispy lash look that Ariana has. Apply only one coat on your bottom lashes.
     17. With an angled sculpting brush, apply a matte bronzer such as NARS Laguna Bronzer to the hollows of your cheeks and to your hairline. Ariana's face is dramatically contoured which is why her cheekbones appear to be so highlighted.
     18. Finally, apply the Revlon Just Bitten lip stain in the color Desire to your lips. It's the perfect shade of pink for nearly anyone and will make you look just as flawless as Ariana!

Hair Directions:
     1. Ariana's hair style in this photo shoot was very retro themed and inspired. First to achieve this look start out with your hair fully brushed out and down. Since you will be teasing your hair for this look, your hair will tease better if you don't wash it the same day that you plan on doing this hairstyle. I recommend washing your hair the night before so your hair has some of its natural oils still in it.
     2.  After you brush through your hair, spray it with a heat protectant since we will be curling the hair. Brush through the hair again to make sure the product is evenly distributed throughout all the hair.
     3. A curling wand will allow you to achieve more of a wave to your hair than an actual curl. Using a Remmington curling wand begin taking  about 2 inch sections of hair and wrap it around the curling wand, the bigger the section of hair, the bigger the curl. Since Ariana's hair is extremely loose curls, you can take big sections of hair, and you don't have to hold them for very long.
     4. Continue curling until all your hair is done. Taking a comb, or even just your fingers, brush through the curls to make then less defined.
     5. Finally spray the curls with hair spray to make sure the waves last all day long.
     6. Big hair is very retro so to achieve this look we will be doing a lot of teasing.
     7. Gathering 1 to 2 inch sections of hair at the crown of your head, take a very strong hair spray and apply it to the roots of that hair. Taking a teasing brush, brush the section of hair that was sprayed, so it gains volume.
     8. Continue doing this until you get the desired amount of volume on the top of your head.
     9. Take a comb and gently comb over the top of what you just teased so it lays smooth and without too many frizzies.
      10. Gather half of your hair, including what you just teased, and pull it back behind your head into a pony tail, or secure it with a coupe bobby pins.
     11. To complete the look, take the end of the comb, or your fingers and gently pull at the hair you just put up into a pony tail. Making the hairstyle look a little messy is perfectly fine! Don't forget one last spritz of hairspray to hold the hairstyle.
     12. To finish off the look, Ariana is wearing a head scarf as a head band. If you choose to do this, any piece of fabric that is ling enough will work just fine. You can tie it in a bow on the top/side of your head, or in a simple knot. Any color or pattern will do, to complete this retro hairstyle that will have you feeling just like Ariana!
    

Friday, December 20, 2013

Vanessa Hudgens Hair and Makeup Tutorial!! (N)

Who says you can't look naturally glowy in the wintertime? Many people think that just because the weather is cold and dreary, their makeup and hair has to accompany that-- but that's not true! Actress and singer, Vanessa Hudgens, is often seen as looking bronzed and summery, regardless of the time of the year. Her hair is typically in loose waves (as seen in the photo to the left) and in this case, her bangs are clipped to the side to show off her radiant makeup look. The makeup mainly consists of browns, bronzes, golds, and oranges with a small amount of peach on the lips and cheeks. Whether you're as tan as Vanessa Hudgens or extremely pale, you can pull off a natural looking tan with a few quick and easy steps! You'll have people thinking you just returned from a long vacation without your look appearing to be forced. Be sure to keep reading to find out just how this look is done!


Makeup Directions:
     1. Sunscreen. This may sound silly but if it's winter or summer, you're going to need sunscreen. Not only will it moisturize your skin, but it will protect it from the sun and harsh winds that winter brings.
     2. After allowing your sunscreen or moisturizer (with SPF, of course) to set, pick up your primer. This is going to be essential for the makeup look due to the fact that you won't want your bronzer or highlights to fade off or melt. If this happens, your artificial glow will look, well, artificial. And that's what we're trying to avoid. So, blend that in all over your skin, up to your hairline and down your neck.
     3. Next, apply a BB Cream or tinted moisturizer (Maybelline has one of the best BB Cream products and it's about eight dollars at any drugstore). Apply the appropriate amount you need onto the tips of your fingers and begin rubbing your hands together. This will warm up the product and allow it to blend into your complexion much easier. Dot the product on your forehead, nose, cheeks, chin, and neck. Then blend it all together for an all over natural coverage.
     4. Conceal any imperfections.
     5. Picking up a concealer that is a shade brighter than your natural skin tone, place the product beneath your eyes and blend it up to your cheekbones. This will begin the process of a natural glow and bring in the appropriate amount of highlight to your skin.
     6. With an angled face brush, pick up a matte bronzer. Avoid shimmery bronzers at all costs because nobody has a natural glitter effect to their skin (that would be weird). Blend the product in the hollows of your cheeks and up into your hairline on both sides, creating a mirrored "C" shape. Also, blend the product down the sides of your nose and down to your neck for a full tan. I recommend using the Nars Laguna Bronzer from Sephora.
     7. Prime your eyelids with a shimmering primer. Cover only your lids with the product, staying away from blending the product too far up. Keep it away from your brow bone and the inner corner of your eye. Bare Minerals Prime Time primer would be a great option.
     8. With a fluffy crease brush, pick up a shimmery bronze eyeshadow and begin blending it in through the crease. Stay out of the outer-V and keep it only in your actual crease.
     9. With a shimmering dark brown shadow, you can now begin applying that to your outer-V. This will add definition to your eye and give more of a dramatic effect (if that's what you're looking for).
     10. Lining your eyes is an optional step but in this case, Vanessa appears to be wearing a black coal liner in her waterline and tight line. An easy trick to getting liner up into your tight line would be to apply the liner to your waterline, then blinking repeatedly. The color should transfer.
     11. One to two coats of your favorite mascara follows.
     12. With a matte peach blush, apply the product to the apples of your cheeks and blend out to avoid any harsh lines.
     13. Finish off the look with a light pink or coral gloss.

Hair Directions:
     1. Start off with your hair down, and completely brushed out to get out all of the knots and snarls.
     2. Since we will be applying heat to the hair, heat protectant is a definite must. Spray a generous amount of your favorite heat protectant on your hair, making sure you get all the way from your roots to your tips. Brush through your hair once more to evenly distribute the heat protectant.
     3. Depending on if your hair curls easily or not, you may need to put a little moose in your hair to help hold the curls.
     4. Take your favorite curling wand and since we want big loose curls, choose a barrel that is 1 1/2 inches or bigger. Wrap a section of hair that about 1 inch big, and wrap it around the curling wand. Hold for about 30-45 seconds and then let it fall. Continue all around your head until all your hair is curled.
     5. To make the curls a little looser and relaxed, take either your fingers or a comb and brush through the curls. Don't forget to spray on hairspray to keep the curls in tact and to hold all day/night long.
     6. To complete the hairstyle, and dress it up a bit, take an inch section of hair at the front of your head on each side of your part near your hairline.
     7. Take both sections of hair and twist the back away from your face.
     8. At the back of the head, take the two strands of hair and pull them together with a small butterfly clip.

Friday, December 13, 2013

Holiday Hair & Makeup Tutorial!! (M)

The holidays are approaching and hair and makeup looks are becoming bolder and more pronounced. People are getting more daring with their curling irons and deep wavers, creating a very texturized and full hair look to wear for the winter season. As for makeup, people are wearing dark shades of purple and shimmering gold tones on their eyes along with a gold highlight and even a dark lip color. This season is focusing on contouring and framing the face, so with this look inspired by Selena Gomez at the 2013 Flaunt Magazine Party, you'll be able to accomplish that.

Makeup Directions:
     1. Begin priming your skin and your eyelids. The harsh winter weather can take its toll on your skin and could ruin it, so be sure to find a primer with SPF in it. It's possible to get sunburn (yes, even if it is cold out, the sun is still out and shining).
     2. Next, apply your foundation accordingly. I would recommend a liquid foundation with a moisturizing element within it to fight your skin from becoming dry and irritated more than it already may be. If your skin is oily, then proceed to use a cream foundation or even a powder one. Cover the entirety of your complexion with the product to give yourself full, matte coverage.
     3. Apply concealer if necessary to spots that may need attention. This may include dark circles, imperfections, or areas that appear slightly more reddened than the rest of your skin tone.
     4. Set your foundation and concealer with a loose or pressed powder of your choice. Blend the product down to your neck.
     5. With a contouring brush, pick up a matte bronzer and suck in your cheeks. Begin filling in the hollows of them to recreate any of the definition that you may have lost while applying the foundation. Also, bring the product up to your hairline and down the sides of your nose.
     6. Next, use a gold tinted highlighter. This could be a liquid or powder, but it might be easier to use powder. In that case, begin brushing it over your cheekbones and also bring some onto your brow bone and the inner corner of your eye. This will draw light onto your face. Also, apply a bronze shade on your lids.
     7. Pencil in your eyebrows if necessary. Bold brows are in this season and will go well with this look.
     8. Skip the eyeliner and go straight to mascara. Apply more coats than usual due to the fact that there is a low amount of product on the rest of the eyes.
     9. Swipe some moisturizing chapstick on your lips and make sure that they are as smooth as they can possibly be.
     10. Apply a dark, plum shade of red on your lips.
     11. Finally, set your entire makeup look with a setting spray. This will protect your skin from the weather conditions and keep it looking fresh and new all day long!

Hair Directions:
     1. Start off with your hair down, and brushed through to get all of the knots and tangles out.
     2. Part your bangs with a center part, and pull the rest of your hair back so there is no part at all.
     3. Starting at the crown of your head and working your way back, begin to tease your hair. Pick up about an inch section of hair, and using a teasing comb, or even a regular comb, start with your comb in the hair, near the roots of your scalp. Begin moving the comb in an up and down motion, without removing the comb from your hair. Repeat this process until the desired volume is achieved. Lightly comb over the top of your hair to get rid of any visible knots.
     4. Now to begin the fishtail braid start off with pulling all of your hair over one of your shoulders. To do this braid, split your hair into two sections. Take a small section of hair from the outside of one of the sections, and cross it over to the opposite section. Alternate sections, and repeat this process until you have braided all of your hair.
     5. Depending on your hair color, secure the end of the braid with either a dark colored, or light colored elastic, to blend in with your hair color.
     6. To achieve the messy braid look, lightly pull the braid out a little so it isn't so tight anymore. Let a few pieces of hair stick out as well. Continue to play with the braid with your fingers until the desired look is achieved.
     7. Finally, use a good, firm hairspray to keep your hairstyle in place all day and night long!