Friday, April 25, 2014

Prom Hair Tutorial!! (BB)

(S.K.) Prom season is upon us, and it coming rather fast! With all of the preparations that have to go into the event, which hairstyle you might want to wear that evening might not be at the top of your list of things to do. I know that personally when I am getting in the spirit of prom, my hairstyle is one of the last things that I decide on. So whether your prom is right around the corner, or still a month or so away, here is an easy idea for a hairstyle that will complement almost any style of dress. Before we start this look, you will need a few supplies handy. A curling wand of your choice ( The NuMe Titan 3 curling iron set is a really great investment if you curl your hair often. You get three different sized barrels that allow you to achieve any look, without having to go out and buy multiple curling irons). You will all be needing a firm hold hairspray, and many, many, bobby pins. Now that you have all of the tools to complete this look, lets gets started. A hair accessory like a flower, or a jeweled clip is always an option.

Hair Directions:

  1. The night before your prom, I would recommend washing your hair. If you wash your hair the morning of the event, from personal experience, the curls tend to not last as long, and fall out a lot faster. 
  2. Begin this look as you should with any hairstyle, by brushing through your hair. Getting rid of any knots or tangles will eliminate the hassle of them while you are working with your hair.
  3. You are going to be adding a lot of heat to your hair with this style so, of course, you need to protect your hair with a heat protectant. The Kenra Thermal Styling Spray will be perfect for this look because it is a heat protectant and a styling spray all in one. 
  4. After spraying an even amount of the product on your hair, brush through it one more time to make sure it is evenly distributed. 
  5. Depending on the thickness of your hair, you might get to skip this step. If you have thin hair, you most likely not have to section off the tops half of your hair, but those of you that have thick hair will probably want to section it off. 
  6. Begin curling the bottom layer of your hair with your curling wand, alternating one curl away from your face, the other towards your face. After the bottom layer is done, you can move onto the top layer of your hair.
  7. An optional step for all of you is to pin the curls as you drop them from the curling wand. If you pin up each curl right after your let it go, it will cool and it should hopefully keep its shape for a longer amount of time. After you have curled your whole head, and the curls are cool, you can remove all of the pins.
  8. Now is where the bobby pins come into play. And you will be needing quite a few of them. Depending on your personal preference, decide what side you want the curls to flow. Split your hair down the middle in the back, and begin pinning the half that is closest to the side of your head that you want the curls fall. 
  9. You really just have to play with the curls, and the way you pin them to your head. You can twist a few, cross some curls over one another, to give it the look you are going for. 
  10. After you have the first half all pinned so it is cascading over your one shoulder, you can start working on the other half. Using the hair that you have left, bobby pin the remaining hair to the same side, and try to cover some of the bobby pins you have already put in place. Make sure to pin the hair almost up the whole back of your head, to achieve the cascading look. 
  11. After all your hair is pinned, all of your hair should be cascading over one of your shoulders. If you have bangs, you also want to curl them, and pin them to the side loosely, creating a side swept effect.
  12. If you have a hair accessory, you can pin it right to the back of your head, near the middle of the curls. This is a great way to hide any bobby pins that were sticking out prior to. 
  13. Hairspray is an ultimate must for prom, and ensuring that your gorgeous hairstyle will stay all through out the pictures the dance, and the post prom fun and festivities!

Demi Lovato "Let It Go" Makeup Look (BB)

     (M.B.) Unless you've been under a rock for the past five months, you have probably heard of Disney's new animated movie phenomenon, Frozen. The animation, the storyline, and the songs tie together so well that the movie ended up winning an award at the 86th annual Oscar Awards. Many believe that the true reason the movie took off was because of the song "Let It Go," sang by the main character, Elsa (voice by Idina Menzel). Young pop-rock singer and former Disney Channel star, Demi Lovato, took her own twist on the smash hit and released a music video along with it that earned 140,000,000 views (and counting). Demi's vocals are powerful and bold during this rendition, and her dark, yet tasteful, makeup matches that. Her complexion and lips possess an icy finish while her eyes are smokey and dramatic. This look is a perfect, real-life representation of the entire Frozen setting and can be worn by nearly anyone whether it's for a night out or a special event!

Makeup Directions:
     1. Starting off with a thoroughly cleaned and moisturized face, start off with your foundation. You want this to be a product with an illuminated, or glow-y, finish. Apply an appropriate amount to the back of your hand and with a sponge, pick up the product and begin blending it into your skin evenly. Using a sponge will give you a flawless "photo-finish." (L'Oreal True Match Lumi Foundation)
     2. Conceal any imperfections you may have and blend away with your ring finger. (Maybelline Fit Me Concealer)
     3. Beneath your eyes, down the bridge of your nose, and in between your eyebrows, use a highlighting formula to draw a subtle amount of light to your skin. Blend away with your ring finger as well. (Dior Skinflash Radiance Booster Pen)
     4. With a large kabuki brush and a translucent finishing powder, dust it lightly all over your face. Focus the product on areas that you know are oily or get shiny throughout the day. This will help prevent that. (Revlon Photoready Pressed Powder in "Translucent")
     5. Whether it's a primer or a base, apply a nude colored formula to your eyelids and beneath them as well. This will keep your eyeshadow from straying or smudging off throughout the day. (Urban Decay Primer Potion in "Original")
     6. Demi is known for her bold, statement eyebrows. So, what would this look be without them? Groom your brows with a spooly brush, putting them into place. Then with a brow pencil, begin gently drawing quick lines to imitate the short hairs that create your brow shape. Keep the product lighter towards the inner area of your brows, then make it darker at the ends. This will assist in giving you a more dramatic arch shape. (Anastasia Brow Wiz Pencil)
     7. Taking a fluffy crease brush and a medium light brown eyeshadow, begin working the color into your crease lightly. Continue to build it up gradually until it is slightly more smokey. Also, bring the color beneath your eye and blend it into your lower lashline. (MAC Shadow in "Espresso")
     8. Pick up a matte vanilla shadow on a flat shader brush and place it on your brow bone for a highlight. (Rimmel Eyeshadow Quad in "Smokey Brun" [the lightest color])
     9. With a matte black (or dark gray) cream shadow stick or smudge pot, blend the color onto your lid using your ring finger. This can be messily done because it is only a base and is used to lock in your dark shadows and intensify them. (Stila Smudge Pot in "Jet Black")
     10. Next, use a slightly shimmery black shadow and apply it over top of the cream shadow you applied with a flat shader brush. You want this to appear fairly bold and intense, so don't be afraid to pack on that color. Then, drag the color down underneath your eye keeping it as close to your lashline as possible. Feel free to smudge it a little for an extra smokey effect. (Urban Decay Naked 2 Palette in "Blackout")
     11. Reduce the harsh line from your shadow with a fluffy brush. Don't blend this up towards your brow bone, but use small circular motions only to soften the edge on the shadow.
     12. With the same fluffy brush (cleaned off, of course), apply a brown-gray slightli shimmery shadow just above the black pigment. This will help you build up a faded, whispy smokey eye. (Urban Decay Naked 2 Palette in "Tease")
     13. Moving onto eyeliner, use a kohl or pencil and work it into your waterline. Also, blend into your lashline and up into your tightline. Then, draw a pretty thick line above your lash line. This can be sloppy or messy as well, because you'll just be blending it out anyways. (Maybelline Define-A-Line Eyeliner in "Blackest Black")
     14. With a smudger brush, drag it across the line you created on your lid.
     15. Set the eyeliner with a matte black eyeshadow. You can definitely use the smudger brush to apply this so that way you won't have to go back and smudge it anyways. (Sephora Collection Colorful Eyeshadow in "Matte Black")
     16. Curl your eyelashes for about ten seconds each.
     17. False lashes are optional, not mandatory. If you do use them, definitely use the singles on your outer corners. This will give you a natural, yet fuller looking set of eyelashes.
     18. Curl your lashes once more once the lash glue dries (wait about one minute, just to be sure).
     19. Apply two or three coats of your favorite mascara to your top lashes. On your bottom lashes, keep it to about two coats only. (Benefit Cosmetics They're Real! Mascara)
     20. Sucking in your cheeks, use an angled bronzing brush to contour your face. Brush this product into the hollows of your cheeks, beneath your chin, and up into your hairline. (Physician's Formula Bronze Booster)
     21. Demi is wearing a deeper, berry-like blush on the apples of her cheeks. So with a blush brush, smile big and lightly dust this onto your skin. Blend back into your hairline for a natural finish. (Bobbi Brown Blush in "Berry")
     22. After moisturizing your lips, use a frosty light pink lipstick on your lips. (Givenchy Rouge Interdit Satin Lipstick in "Pink Whisper")

*Please note that the products listed after each step are only examples to give you a better idea of what each product looks like. You can easily substitute any of them for drugstore/high-end products (whichever you prefer).*

Wednesday, April 9, 2014

Frozen Hair Tutorials!! (AA)

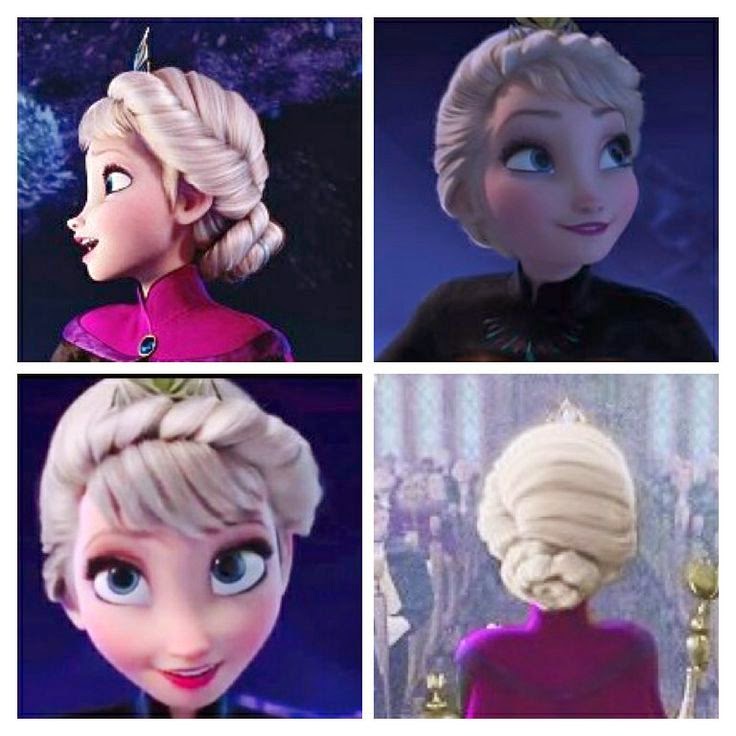
(S.K.)Two time Oscar winning, Disney's Frozen has been one of the most popular films for the past few months now. From it's classic story line, to its catchy tunes, Frozen has shown to be a hit to people of all ages. Throughout the animated film, main characters, sisters, and princesses, Elsa and Anna each posses hairstyles that embody the typical princess. The two hairstyles that the girls have at the coronation are similar in a sense that they are both up dos, but they each have their own unique twist on them. Follow these steps to get the princess looking hairstyles just like Elsa and Anna!

Directions for Elsa:
  1. First for Elsa's hairstyles. Begin the hairstyle by brushing out all of your hair. We are going to be working with the hair quite a lot so we want to ensure there are no knots or tangles. 
  2. Parting your hair to one side, brush over the remaining hair, so that all of your hair is now falling down one of your shoulders. Spray the side that doesn't have all of the hair with a  little bit of hairspray for stability. 
  3. Next we will begin the twist that comes down the side of Elsa's head. Gather a pretty decent size of hair at the top of your head, where bangs would be. Begin twisting the hair away from your face. Only twist it a few times, then stop. Don't twist this too tight, because you want there to still be a little volume at the top of your head.  
  4. Add another smaller section of hair, from right below where you grabbed the first section of hair, to that twist, and twist them together. Repeat these steps of adding hair and twisting until you reach all the way down below your ear, and to the base of your neck.
  5. Take the hair that you have incorporated into the twist, and bring it over to the other side of your shoulder. Wrap the section of hair that is twisted, around the section of hair that is not, almost as if you were creating a pony tail holder with it. 
  6. Twist the hair while you wrap it into the bun shape. You will need to use bobby pins to pin the bun into place as you continue to twist it. Make sure you secure the ends tightly and hide all small pieces of hair sticking out. 
  7. Taking the remaining hair that isn't in a bun shape, you can begin twisting that just like you did with the first section of hair.
  8. Wrap it right around the outside of the bun you have already made, to create a more fuller looking bun. You will also need to pin this with bobby pins as you work it around. 
  9. For the finishing touches, a little bit of hairspray will make sure the hairstyle stays all day long.
Directions for Anna:
  1. Elsa's sister Anna's hair is similar in the fact that it is a bun, but the steps taken to achieve it are very different, but you must follow the same first step which is to brush out all of your hair. 
  2. Start by taking a section of hair, right above her eyebrows, and bring it back over the top of your head. Brush it out so you don't have any huge bumps. Secure the hair with a small elastic that matches you hair color.  
  3. Now to start creating the braid that will be acting as a headband. Take two sections of hair, from behind your ears, and braid them regular, all the way down and secure them with an elastic.
  4. Bring them up and over the top of your head to create a headband. Secure the ends with bobby pins, so the elastics are no longer visible. 
  5. Taking the rest of your hair that is down, begin twisting it into one tight wrap. Now begin the same steps of twisting the hair into a bun shape and pinning it with bobby pins as you go. But this time, create the bun in the shape of a doughnut. The hair that you first tied back, will show through the middle of the bun.
  6. Continue pinning the bun into place until you reach the ends of your hair, and hide the tips of your hair.
  7. For a finishing touch, if you have a green ribbon, or really any ribbon, you can secure it to a clip and stick it to the bottom of the bun.
  8. A little hairspray and you'll be on your way to looking just like a princess! 

Wednesday, April 2, 2014

All-over Bronze Look (Z)

     (M.B.) It may seem like summer is far away with the bitter cold weather, but that doesn't mean you can't look like you've been laying out in the sun for a few hours! With the proper products and techniques, you can achieve a flawless and completely natural glow. This look is inspired by Demi Lovato at the 2012 ALMA Awards where she had a warm, sun-kissed makeup look. You could wear this nearly anywhere because it's super natural and super simple to accomplish. Let's get started!

Self-tanning Directions:
     1. Before you even think about using self-tanning products, you have to be fully exfoliated. Once you've been completely cleaned in the shower, put an exfoliating scrub of your choice on a loofah and carefully begin applying it to your skin. Don't scrub too hard because that could seriously irritate your skin, which you don't want. All you want is to give your skin a smooth canvas to apply the self-bronzing product to. Rinse off the product with warm water. (Fresh Brown Sugar Body Polish)
     2. After washing your face, apply a small amount of a facial exfoliater to your finger tips and begin working it gently into your skin to remove any dead skin cells or "rough patches." (St. Ives Apricot Scrub)
     * A quick tip: when you get out of the shower, pat your skin dry. This will lock in the moisture and keep your skin mostly hydrated.
     3. When you're completely dry, put on a pair of latex gloves to prevent your hands from becoming orange.
     * Make sure you're wearing a bathing suit that you wouldn't mind getting stained. Even if you avoid the fabric, chances are it will end up getting on it. (Trust me, it's not easy to get out.)
     4. Apply a half-dollar amount of tanning lotion to your fingertips and begin working it into one of your arms. Blend it in as best as you can so that there is no streaking or patches. Once it is blended in to your liking, continue applying it to the rest of your body. Use the product sparingly on your knees and elbows so they don't appear as an orange tone. (Victoria's Secret Self-Tanning Lotion)
     5. Immediately wash your hands with warm water to keep your hands from being too tan or orange as well.
     6. Allow the lotion to dry over a forty-five minute period. Don't touch anything or lay down because it could potentially streak, which you obviously don't want.

Makeup Diretions:
     1. Begin with your usual skin care routine.
     2. Instead of your typical facial moisturizer, use one with a tanning feature in it. Avoid using body tanning products on your face, for it could cause your skin to break out extremely bad. Also, the color will most likely be darker and make your face appear dirty. (Gross.) (Jergen's Natural Glow Complexion Lotion)
     3. If you can go without using a foundation, definitely do that. You're not going to want to take away from the tan you're building up and you also want the appearance of a flawless complexion.So, apply an appropriate amount of product to your fingertips and blend it into your skin. Bring the product down to your neck for a natural finish.
     4. Conceal any imperfections, around your nose and mouth, and beneath your eyes.
     5. Skip over bronzers and blush for now and go straight for your eyelid primer, blending it in with your ring finger.
     6. With a light hand and a fluffy brush, pick up a matte skin-toned color and wash it over your entire lid to give you a neutral base. ("Strange" by Urban Decay)
     7. Now with a matte brown with a red undertone, pick up the product with a fluffy crease brush and blend this into your outer crease. Draw this out to the end of your brows for a whispy winged look. ("Nooner" by Urban Decay)
     8. Taking the same fluffy crease brush, pick up a dark shimmery bronze shadow and work it over the matte brown you have already applied. Blend until you achieve a smokey effect. ("Factory" by Urban Decay)
     9. Pack a lighter version of the shimmery bronze onto a flat shader brush and put it on your lid. If necessary, go back in with a fluffy brush to blend the products together. ("Liar" by Urban Decay)
     10. With the same color, bring it underneath your eye. Keep it close to your lashline for a natural look.
     11. Taking a smaller flat shader brush and the matte skin-toned eyeshadow you earlier used, bring the color into your crease and onto your browbone for highlight.
     12. Tightline your eyes with a black kohl liner by lifting your lashes with your index finger. (Maybelline Define-A-Line Eyeliner in Blackest Black)
     13. Curl your eyelashes.
     14. Apply a lengthening mascara rather than voluminizing due to the fact that you want to keep up the whispy, smokey effect. (Maybelline Illegal Length Mascara in Black)
     15. Moving onto the face, you're going to want to use a very light coral pink blush on your cheeks. With a large blush brush, swipe the color from the apples of your cheeks and back towards your ears. (Hourglass Ambient Lighting Blush in "Dim Infusion")
     16. Apply a lightly shimmery bronzer to the hollows of your cheeks, up into your hairline, and beneath your chin. It's okay to use a bit more than you usually would, but make sure it stays natural. You don't want your tan to look fake even though it is. (Benefit Cosmetics Hoola Bronzer)
     17. With a smaller brush, begin to shape your nose if necessary.
     16. Using a liquid highlighter, apply it to your cheekbones and down the bridge of your nose for an illuminating glow. (Benefit Cosmetics Sun Beam)
     18. Apply a moisturizing lip balm.
     19. Here, you can just apply a tinted light pink lip balm. (Maybelline Baby Lips Dr. Rescue in "Coral Crave")
     * If you plan on using the Maybelline Baby Lips, just know that it lasts up to twelve hours! It's a really great lip moisturizer that will protect your lips from the sun or any other harsh weather conditions.

Chalk Dye Hair Tutorial!!! (Z)

(S.K) Demi Lovato has had many many different hair styles over the course of a few years. As well as many different cuts, she has had it many different colors as well. From blonde to brown, to even pink and blue, Demi has done it all. Now you might not want to be as daring, and permanently dye your hair a bright and bold color. Here is the perfect solution for you! Adding temporary color to your hair is the perfect way to get ready for the Spring. Follow these simple steps to get the vibrant streaks of color just like Demi has!

  1. Whether you are a blonde or a brunette, you can do this to your hair! First thing you will need to do is to gather your supplies. For this temporary dye, we will be using chalk pastels. You can get them at your local craft store for only a few dollars, and they come in a lot of different colors. Make sure you don't get oil pastels. Oil pastels will be extremely difficult to get out of your hair. The chalk pastels are the ones you want to get. Sennelier brand pastels are a very good brand to use. 
  2. For those of you that have dark hair, you need to wet down your hair before you do the chalking in order for the color to come out bright. Those of you that have light colored hair do not need to dampen your hair beforehand. To get the colored streaks in your hair, section off your hair to get it ready to color. I recommend taking pieces of hair at the base of your neck, at the bottom of your head. You can also put the strands throughout your whole head. 
  3. You are using chalk, so there is a little but of a mess involved. Make sure you stand over an old towel while doing this to catch all the loose chalk dust that falls.
  4. Take the piece of hair that you want to dye, and twist it from the root to tip.
  5. Take the chalk pastel and begin to rub it over the twisted hair. 
  6. Depending on if you want the whole strand of hair to be dyed or just the tips of your hair, you will need to put the chalk in different spots. You can even try using more than one color on the same strand to get a tie dyed look.
  7. Those of you that have darker hair and have to get the strands of hair wet, will do the same steps like twisting the hair. The only difference is that your hair is damp. Even if you have light colored hair, you can still do this while your hair is damp, it will just stay in your hair for a longer period of time. When the water mixes with the chalk it created a pigment that stays in your hair longer and acts as a dye. It is still temporary, but it will last longer than just one day.
  8. After you are all finished chalking your hair, you can style it in any way that you would like. This can be the fun part of the colors because depending on how you wear your hair, the different colors will be visible. 
  9. A fishtail braid, or an up do are two of the looks that can really emphasis the color streaks in your hair. Or you can simply leave it down. If you choose to dye your hair just on the tips, leaving it down will make a bold statement.
  10. At the end of the day, you are putting dry chalk into your hair, so it is going to dry it out and strip it of its natural oils. Make sure you thoroughly condition your hair at the end of the day, after you brush out most of the powder, to return the moisture to your hair. 
  11. I wouldn't recommend doing this to your hair on a regular basis because of the fact that it does dry out your hair. Every once and a while is okay though! And perfect for the upcoming Spring and Summer months!

Friday, March 28, 2014

Kylie Jenner Inspired Makeup Look (Y)

     (M.B.) Kylie Jenner is the youngest of the well-known Kardashian siblings. She is seen as a fashion icon for many young girls in the teenage age group with her bold yet completely comfortable style. On Instagram, she's known for taking flawless selfies with different makeup looks every time. While her outfits appear comfortable, she isn't afraid to take it a step higher with her makeup. She's been seen with strong cat eyes, strong eyebrows, bold lips, and even a smokey eye, which is what I will be teaching you how to do today. This look can be worn for almost anything even if it is a bit more daring than what you're used to (in fact, I'm wearing something similar at school right now).The look (seen on the left) may seem like it's difficult to achieve, but it's actually only four shadow colors along with liner and mascara. Depending on how dramatic you'd like it, you can build up the color or use a lighter hand.


Directions:
     1. After cleansing your skin, begin with a foundation or BB cream of your choice. This all depends on what kind of attention your skin needs. If you need heavier coverage, use a foundation. If your skin is mainly cleared and doesn't need a whole lot of attention, go with a BB cream or tinted moisturizer. (Maybelline Dream Fresh BB Cream)
     2. Conceal any imperfections you may have along with the area around your nose to erase any redness you have. (Amazing Cosmetics Concealer)
     3. With a concealer that is a shade lighter than your skin tone, begin highlighting beneath your eyes. You're going to want to create two upside down triangles going down to the middle of your nose. Then, draw a line down the bridge of your nose, your chin, and in between your eyebrows. Blend this out with your ring finger. (Maybelline Fit Me Concealer)
     4. An optional step is to set your makeup with powder and a fluffy brush. Blend this down to your neck and keep a light hand. You don't want your makeup to appear at all cakey because Kylie has a fresh, "no makeup" looking face. (Rimmel Stay Matte Pressed Powder)
     5. Make the apples of your cheeks prominent by smiling, then apply a small amount of a bubblegum pink blush to them with a blush brush. Only apply this to the outer half of your cheeks so it doesn't contradict with the highlight. Blend this out to your hairline. (Tarte Amazonian Clay 12 Hour Blush in Dollface)
     6. Suck in your cheeks and apply a matte bronzer to the hollows of them with an angled bronzing brush. Create a mirrored "C" shape by bringing the product up to your forehead. Also, put it beneath your chin lightly. Then, with a small fluffy brush, reshape your nose if necessary. This will help make the highlight more pronounced. (Physician's Formula Bronze Booster)
     7. Prime your eyelids with a primer or base that you know will last all day and hold your shadow in place. (MAC Cosmetics Painterly Paint Pot)
     8. Groom your eyebrows with a spooly brush.
     9. Kylie's eyebrows have a high arch and are pretty bold. So when you begin to pencil them in, don't be afraid to use a heavier hand than usual. (Maybelline Eye Studio Brow Pencil)
     10. Now onto the eyeshadows (the fun part)! With a flat shader brush, pick up a matte mauve color and pack it onto your lids. If the color is heavily pigmented, it's better because you want to be able to blend it out into your crease. (Urban Decay Naked 3 Eyeshadow Palette in "Nooner")
     11. With a clean fluffy brush, blend out the product to your outer crease. You're going to want to focus the darker colors on the outer portion of your eye to create that smokey cat eye that Kylie has.
     12. With a fluffy crease brush, begin working a matte warm brick tone into your outer corner. Feel free to blend it up slightly, but don't do it too far. You want most of the color focused on your outer area. (Urban Decay Naked Palette in "Buck")
     13. With a smaller crease brush, begin building up a slightly shimmery dark chocolate brown shadow into the hollowest part of your outer corner. Continue to build this up to your liking. (Maybelline ExpertWear Eyeshadow Single in "Made for Mocha")
     14. Taking the same color and a small flat shader brush, bring the color down to your lower lash line only about halfway. This will define the area around your eye without giving it the dreaded "raccoon" effect.
     15. Picking up a matte vanilla color on a small flat shader brush, begin placing the color beneath your brow bone for a highlight. Then, place the color by your tear duct. As you can see, Kylie's highlight is pronounced so don''t be afraid to build up the color appropriately. (Sephora Matte Colorful Eyeshadow in "Lazy Afternoon")
     16. It's difficult to tell what type of liner Kylie is wearing, but I'm going to assume that it is a black kohl pencil. Keep the line as close to your lashes as possible because this product was used clearly to thicken the lashes. Also, wing out the product just slightly. Then with a smudger, blend in the product to reduce any harshness. This will assist in the smokey effect you want. (Maybelline Define A Line Eyeliner in "Black")
     17.An optional step is to apply false lashes. If you do so, use ones that are long and sparse. Kylie's lashes are long and spidery, so this will help make yours appear that way as well.
     18.Curl your lashes.
     19. Apply a volumizing mascara to help blend your false lashes with your real ones. (L'Oreal Voluminous Mascara in "Black")
     20. Use a moisturizing lip balm. (EOS in "Sweet Mint")
     21. Kylie's lips are matte in the picture, so use a rose-y pink matte lipstick. (Rouge Dior Nude Lip Blush Lipstick in "Charnelle 459")

Thursday, March 27, 2014

Spring Hairstyles!!! (Y)

(S.K.) Spring is here and it came faster than we thought it would! With all of this cold and snowy weather, it doesn't feel like it is Spring at all. Here are a few quick and easy hair styles that will get you into the spirit of Spring! What a better way to remind you of Spring and get you into the season than flowers! Flowers or floral headbands are something that can be a very simple addition to your look, but at the same time, they add a very unique touch to your outfit. Depending on how you wear them, you can make them look bohemian, or just girly.


1.     Floral head bands can be worn many different ways and with any type of hair style. You can leave your hair down and natural, curled, or even straight. Anything will work for this really. For a more bohemian look, keep your hair down, and put the floral headband over the top of your head, like a crown. Move it down until it is near the center of your forehead.


 2.     If you want to wear a floral headband, but want to dress it up a little more, and make the look seem more girls, a simple up do will be perfect, and the touch of the flowers will be the perfect thing to add a little bit of girly-ness to the hair style. A headband with a stretchy back is recommended for this look. First, put the headband on over your head like in the first look, but instead of moving the flowers down to the middle of your forehead, keep them at the edge of your hair line like you would a regular head band. Next, taking the hair that is down, falling behind the headband, bring it up and wrap it over the stretchy part of the headband at the back of your head. tuck the hair into the headband, so it creates a slightly messy, spring up do.


3.     Loose flowers can also be used in hair styles. Real or fake, either will work! Of course real ones will only be able to be used once, and fake ones can be used over and over again. For this look. you will want to start off by parting your hair to the side, and braiding all of your hair to one side of your head, and bring it over your shoulder. This is where you can add your personal preference. You can either do a regular three stranded braid, a four or even five stranded braid, a fishtail braid, or any other braid that you want to. Don't forget to pull at the braid when you finish it, to make it looser, and give it a more wispy effect. Now for the flowers, fake ones will most likely have a small metal stem on the ends of them that will be perfect for sticking into the braid. Arrange them in any pattern that is pleasing to you, and you are ready to go!

4.     The last look that you can incorporate flowers into is a waterfall braid. Just like the first look, your hair will need to be down, but it can be styled any way that you want, meaning that it could be natural, straightened, curled, or whatever you like. When you begin the braid, you are going to wrap it around your head, just below the crown of your head to give it a more laid back kind of feel. Begin braiding your hair as normal to create a base for the braid, Drop the bottom section of hair, and pick up another piece from the bottom. The pieces you drop will be what creates the waterfall. Alternate with grabbing pieces of hair from the bottom then the top of your head. Work this braid all the way around your head until you get to the front of your head. Finish the waterfall braid off with a regular braid, all the way down to the tips of your hair and secure it with an elastic. Now for the flowers, you will be adding them just like you did in the last hair style. Poke them into the braid, all the way around your head. You may need to use a few bobby pins to make sure they are secured in place, and don't fall out of the braid.


      Friday, March 14, 2014

      Lily Collins Inspired Makeup Tutorial (W)

           (M.B.) Lily Collins has been making her mark in the acting industry between her roles in Abduction, Stuck In Love, and The Mortal Instruments: City Of Bones. Not only has she been recognized for her nearly flawless acting, but her unique, yet completely wearable, makeup looks. Lily has very pale skin and unlike many people in our society today, she embraces it. Also, she isn't afraid to keep her bold eyebrows and make them stand out even more with a little bit of pencil. This look can be worn everyday or even for a special outing.

      Directions:
           1. As usual, begin with a clean face. Lily (just like every celebrity) has perfect skin and to achieve that, she most likely washes it everyday. Washing your face twice a day may seem like a hard task to achieve but if you keep at it, it will become a part of your daily routine.
           2. Prime your skin. This will also assist in clearing up your face, creating a smoother canvas for your foundation, concealers, and other facial products.
           3. With a foundation of your choice, apply an appropriate amount to your (clean) fingertips. Then, dot the product on your forehead, cheeks, nose, chin, and the excess on your neck. Blend it out. The warmth of your fingertips will come as an aid in blending out the product as naturally as possible. Also, note that the lesser amount of foundation you can get away with is better.
           4. Conceal with a cream foundation. Apply this beneath your eyes, down the bridge of your nose, and on any imperfections you may have. Don't forget to blend out. In this look, natural looking skin is key.
           5. With a fluffy brush and a translucent powder, lightly buff it over your skin. This will set your makeup and lock it in place so that it won't run or streak.
           6. Prime your eyelids with a fairly opaque product. You want to prevent as much discoloration as possible and create the cleanest lid space possible.
           7. Groom your eyebrows with a spooly brush. If you'd like to, you can brush them upwards slightly to give off the illusion of a fuller brow.
           8. Find an eyebrow pencil that is closest to your natural shade. Just because you are going for bolder brows, doesn't mean you want them to look fake or drawn on. Make light strokes with a light hand to make them look natural and full like Lily's.
           9. Run your spooly brush back through them to help blend and make the pencil lines appear less harsh.
           10. Moving onto eyeshadow, pick up a flat shader brush and an orange-tone champagne shade. Pack this color on the lid and slightly into the crease. Then, bring the color to your lower lash line approximately halfway in. This will make your eyes appear smokey.
           11. Next, take a fluffy crease brush and a matte taupe shade shadow. Blend the color into your outer-v and into your crease to deepen the look. Then, bring the product to your lash line again but this time, keep it closer to the waterline. Only put the color one-third of the way in.
           12. Continue to work more of the taupe shade into your outer-v to intensify your eyes. The color will eventually build up to your liking.
           13. Tight line your upper and lower waterline using a kohl black pencil. If you don't know how to apply the color to your upper waterline, an easy solution is to apply an excess amount to your lower waterline and then continuously blink. The liner will transfer up into your waterline.
           14. With that same liner, lightly line just above your upper lash line, keeping it as close to it as possible. Avoid doing a dramatic wing. Keep it fairly simple.
           15. With a cotton swab or blending brush, smudge out the color to keep up with the smokey effect you're attempting to create.
           16. An optional step is to set your liner with a matte black shadow. If you do this, smudge it out to the best of your ability.
           17. Break out your favorite mascara and apply two to three coats of it to your upper lashes, focusing more of the product on your outer lashes for the same whispy effect that Lily has. Then, apply some more mascara to your lower lashes. Keep it to a minimum of two coats.
           18. Lily has defined cheekbones so to create that you're going to wan to sculpt your face with a matte bronzer. Suck in your cheeks and fill in the hollows with the product, then blend it upwards into your hairline for a mirrored "C" image.
           19. Next, apply a coral blush to the apples of your cheeks.
           20. Lastly, apply a coral toned lip balm to your lips.

      Spring Into Color Makeup Tutorial (V)!!

      (M.B.) With the spring season steadily approaching, new makeup looks are coming into season as well. You've probably been seeing bright, illuminating colors on the covers of magazines like Seventeen and Vogue in many different ways. The "pop of color" makeup can be created in many ways. You can use a colored shadow, mascara, or in this case, eyeliner. You could also use a pop of color on your cheeks or lips, but this look is for those who want something quick and simple with very little hassle.


      Directions:
           1. Prime your eyelids. Make sure to use a primer that you know will last a long time. This step is very important because primer helps intensify the color of the shadow. Use your ring finger so that there is no tugging on the skin that could potentially create wrinkles. It is very important that you are careful when bringing the color to your lower lashline. The color is going to be prominent here so you need to focus most of the product in that area.
            2. Begin with a neutral shadow that is similar to your skintone. It can be matte or shimmery, but be sure to keep the shimmer to a minimum. If there is too much, it will be too overdone and the eye won't be drawn to the color. A champagne tone shadow would be best.
           3. An optional step would be to contour your eyes with a darker shade of brown. This should definitely be matte so it won't contradict or bump heads with the color you'll be using.
           4. Highlight with a soft, shimmery white. Focus the product on your brow bones and the inner corner of your eye. This will draw light to your face without distracting it from the color.
           5. With a colored kohl eyeliner of your choice, begin dragging the pencil along your lower waterline. Don't push too hard because you could possibly scratch your eye. Move it back and forth along the waterline so that the color is extra pigmented. Try avoiding colors like hot pink, orange, and red. These colors could make your eyes look irritated or bothered, which isn't what you want. The best colors to use are blues, greens, and purples.
           6. An optional step is to set the color with an eyeshadow. This is also the time to slightly blend the product into your lower lashline. Not only will it set the color but it will also allow the color to be more noticeable.
           7. Black eyeliner on the upper lashline is optional. If you do decide to use it, a pencil is probably better so that it can be blended better. Avoid a heavy wing because it will draw attention away from the color.
           8. On the top lashes, apply mascara as you usually would.
           9. This step is also optional. You can take a colored mascara that matches your eyeliner and apply it to your bottom eyelashes for further coloring. In the photo above, she is wearing black mascara but personally, I believe it would be better to use color to enhance your look.